 |
|
|
|
|
|
|
|
|
|
|
|
|
|
|
|
|
|
|
|
|
|
|
|
|
|
|
|
|
|
|
|
|
|
|
| CLAYING AROUND PRESENTS |
|
|
| HOW TO HINGE AN EGG |
|
|
|
 |
|
 |
|
 |
|
|
|
|
|
 |
|
|
|
|
|
 |
|
|
|
|
|
|
|
|
|
|
|
|
|
|
|
|
|
|
1)
You know the drill, drill the egg, blow, wash, dry in oven 10
min. |
|
2)
Cover the egg with a thin layer of white Sculpey then cure. |
|
3)
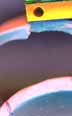
Draw where you want the egg to separate then carve n crack. |
|
4)
This is how it looks just cracked through. |
|
5)
Cover the inside, overlap the edges, smooth then cure. See
(9) |
|
|
|
|
|
|
|
|
|
 |
|
 |
|
 |
|
 |
|
|
|
|
|
|
 |
|
|
|
|
|
|
|
|
|
|
|
|
6)
Measure and mark where you will carve a space for the hinge. |
|
7)
Smerge an anchoring layer of clay for your hings to be set in. Flex back
and forth. |
|
8)
Cover top of hinge with clay and smerge with edges inside and out, build
up under any ledge. |
|
9)
when you cure after coating the inside or attaching the hinge, put paper
between sides. |
|
10)
you don't want your edges to bond and you don't want your hinge to be
bonded shut. |
|
|
|
|
|
|
|
|
 |
|
|
|
 |
|
 |
|
|
|
 |
|
|
|
|
|
|
|
 |
|
|
|
|
|
|
|
|
|
|
|
|
|
|
|
|
|
|
11)
Now I know it doesn't look to eggish, but... |
|
12)
with a little carving and sanding it can look sweet. |
|
13)
I had done the inside before doing the outside. |
|
14)
This is what it looks like when cured too long...spacing out
here. |
|
15)
This is the nearly finished egg with polymer clay
deocrations. |
|
|
|
|
|
|
|
BACK |
|