
Compress Natasha Log before slicing the bead. Scroll down to the bottom for the text on this technique.
beads. I stopped watching my movie to watch what my hands were doing
in order to determine which step I left out in my tutorials.
Compression...
Ok, let's use a block of chopped trims and slice off what you feel is
ONE BEAD worth. The bead log is as long and as wide as you'd like it
in the final state. Most likely it will be so narrow, so skinny that
slicing that in half and then slicing those halves in half again is
making our bead making difficult.
Here is what I do. I line up the trims and chop that I'm using for
that bead, form the final size before slicing. Then I compress that
narrow, skinny bead log into a FAT SQUARE. The designs you wish will
be compressed into thin strips, don't worry, they will reappear
later...
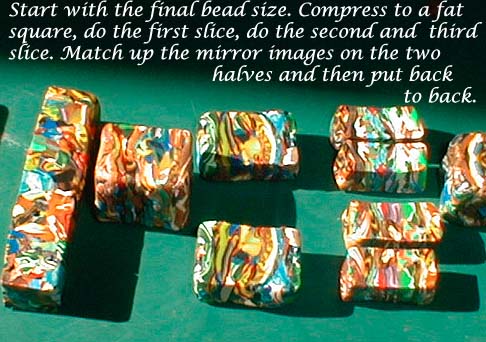
Ok so instead of having this skinny, narrow, hard to slice final bead
size you have this compressed FAT SQUARE. Get a ruler that shows
metric and measure where it's the half way point on that fat square.
Make your first slice and let the two sides gently fall open like a
book. DO NOT MOVE those two sides. Pitty Pat them so they don't rock
and have a flat surface, and make your second and third cuts after
measuring.
The design will be only thin and busy compressed lines. Don't trip
about them right now. Just open the last two slices like books. Match
the two mirror images. Put the two halves together back to back,
matching up the sides.
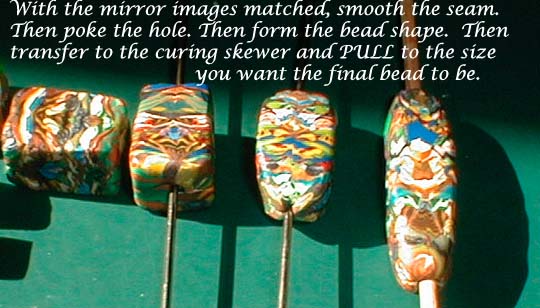
SMOOTH THE SEAMS NOW. Press down on the seams with a finger tip and JIGGLE in tight little circles. It'll merge the two sides. Roll a
brayer or the side of your tool over the seam after jiggling, do to
all four sides.
Trust me, smooth the seams while the bead log is compressed. So you
end up with a FAT SQUARE SMOOTH Natasha bead.
POKE THE HOLE down the center of the FAT SQUARE... so much easier than poking a hole in a skinny, narrow bead, yes? Dust your skewer or
knitting needle or what ever you're using with baby powder or corn
starch and poke your hole and put that FAT SQUARE Compressed Natasha
bead on the skewer it's going to cure on.
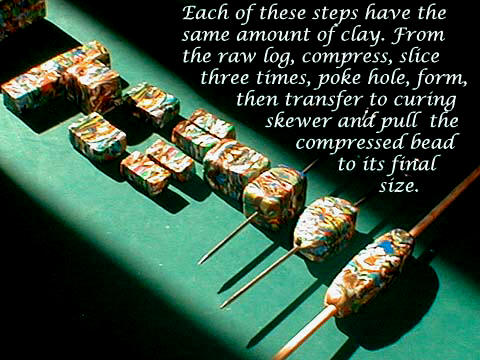
NOW... this is when you start forming the bead to it's final shape....
GENTLY PULL THE BEAD to the skinny, narrow size and watch your designs appear, seams smoothed, on the skewer, ready to be cured. Easy Breezy.
You will not have uneven sides when making those three slices on a big
surface. You won't mash small beads with smoothing out the seams if
you work with it compressed. You won't have bead holes wandering all
over the bead all crooked if you pierce the bead when it's a fat
block. You won't loose the shape of your bead if you fashion its final
form on the skewer it will be cured on.
The compression of the bead log before slicing, keeping it compressed
to smooth the seams and poke the hole, has been tested for these last
few weeks. In making hundreds of beads at one time I've been finding
what I have to do to make my life easier... this tip is what I
discovered.
I hope it helps some,
xoxo
NJ