
 Nattering about the Mexican Food
in a Jar: Three claymates made comment and asked about the making of the
chilies; the covering of the pizza protector and THE FEAR of mushroom slices.
Here is my reply.
Nattering about the Mexican Food
in a Jar: Three claymates made comment and asked about the making of the
chilies; the covering of the pizza protector and THE FEAR of mushroom slices.
Here is my reply.
such nice things.
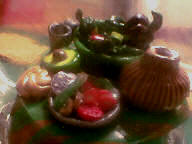
Honestly the Chilies are a really nice beginner's mini food effort.
I'll quote from the "C" page and add the information that's not there.
"The chilies are from a book on Mexican cooking."
"Mexican Healthy ways with a favorite cuisine" written by Jane Milton,
ISBN#1-84309-125-9, bargin bin at Borders.
Colors used:
The basic green of half blue and half yellow was mixed and half as
much translucent was added.
Cadmium Red straight out of the pack.
Zinc Yellow straight out of the pack.
"Serrano the red ones" Cadmium red straight out of the pack.
"Fresno the light yellow and light green; "
Basic green and zinc yellow, do different shades for these go from
Yellow with at touch of Green to Green with a touch of Yellow.
"Poblana the big dark one; "
three portions of basic green and one portion of red, looks brown and
cures darker.
"Jalapeno the dark green. "
The basic Green was mixed with the Poblano mix, bit by bit just to
darken the green. Can't give you ratios because it's an eyeball thing.
All the chilies have these little "hats" and from that come the stem.
I took the smallest hex cut out plunger tool that Karen at ClayAlley
makes and mashed the edge of a Dark Green sheet and cut out a hex.
Took a zero sized clay shaper cone tip and drew out the pointy ends
from the center like in a star burst. Poked a hole in the center with
the tip of the clayshaper. Scraped that up off the tile with the
exacto knife and put it on the ends of the Chilies. Roll out a snake
with a tapered end, as small as you can and cut off a stem. Put the
pointy end of the stem in the hole you poked in the middle and give it
a mash.
The chilies are just tapered snakes of different widths and lengths.
Look at this page here and see the different chilies in real life.
http://www.angelfire.com/biz2/collectibles4u/peppers.html
I use the Dark Green mix for all the stems, regardless of the Chilie
type.
Some Chilies are thin and straight. Some are long and curved. Some are
really Peppers and have "tuck and roll" indentations and curved tops
like the Poblana. I feel translucent in the mix is important for when
chilies are ripe they are filled with water, they do have a luminious
color to them. We'll deal with dried chilies that are strung at
another Demo. There's the whole drying process going from plump and
red to wrinkled and dark red brown, anywhere in there you can do
chilies that are on a string.
So the trick with chilies is in the mixing of the colors, for rolling
out a snake and giving it a hat with a stem, bending it and tossing in
a bowl just seems too easy breezy for me.
Now what else. Oh the Pizza Protectors, ya they withstand the 1/2 hour
at 265F or 130C. No problem. They withstand melted pizza cheese and we
all know that's a gazillion degrees hot. I've covered the legs and
decorated the tops of these pizza protectors. Just covering with a
clay fabric sheet is just the easiest effect for the new mini clayer.
Biz-Archive/Faux/TigersEye/Table-thm.htm Here's a pizza
protector done fancy with Tiger's Eye cane.
Wouldn't you just know that my first covered pizza protector was Day
of the Dead flavor? From 1998,
http://www.geocities.com/mizkoshka/table.html
Sharon: Those mushrooms are easy... three colors of brown, light,
medium and dark. Do a stack of medium and dark and get a crescent
shape with it, like a dirty toothed grin. Surround with light brown.
Reduce and slice. Cure a mess of them and then surround with no color
translucent if you want some in a jar. But in the bento box is a good
idea and hey, Gyoza Grrl, the pix were good to see. Mini Japanese
food, how close to my heart are they already? LOL
What else.. oh the inside of the jar lid had two sheets of clay laid
down, two of the thickest sheets from the pasta press. The legs of the
table were embedded in that clay. The food was already cured and
finished. A raw clay sheet was pressed to the thinnest to get the clay
fabric. I used the gold and green fish scale sheet.
Biz-Archive/Faux/FishScale/017
To get a table cloth that fits quick. Turn the sheet over face down.
Lay the top of the pizza table on the sheet. Tilt the table until the
legs touch the sheet. Pick up the table and turn a quarter turn and
touch the legs down again. Keep on turning and tilting those legs down
until you get a wagon wheel effect...light touch now, we don't want
these marks to go through the whole sheet. Then just cut around the
tips of the leg indentations and you have a table cloth that will fit
that pizza protector faster than you know.
I'll put all this up on a page connected to The Mexican Food in the
Jar section.
I best send this out it's taken a while to get organized.
xoxo
NJ